My New Home - Alarm Clock
I recently picked up a Lenovo Clock 2 on offer. I got it for around £25. I knew it ran Android and thought that for that price, it was worth picking one up to mess with.
After a couple of searches, I found a guide to installing other android apps on it.
Once I’d installed a custom launcher, I was able to get into the android settings and start disabling apps. I disabled the vast majority of them although I was unable to disable the Google Assistant app. At the time of writing, there doesn’t appear to be a reliable root method for the device. There is also no USB interface so even an adb shell was unachievable.
Dealing with the microphones
For me to have a device like this plugged in, in my house, I want to be absolutely certain that it isn’t sending any data back to its Google mothership.
The device has a toggle on the back that switches the microphone off. This is a software toggle. This has 2 issues. Firstly, it could conceivably be overwritten in software. Second, it puts an icon on the screen to tell you that it’s muted. This takes up a significant part of an already small screen. So, I took the device apart to see if the microphones were removable.
I should probably make the point here that the following procedure will void any warranties you may have on the device. Also, this is not advice, I am not responsible if you break it, or hurt yourself or anything else.
Disassembly was surprisingly easy. After unsticking the non-slip ring on the bottom, there were four screws to undo – one in each corner. After doing this, the bottom of the device can be prized off. There are a few plastic clips and a ribbon cable to be aware of, but if you have ever disasembed anything before, it should be quite easy.
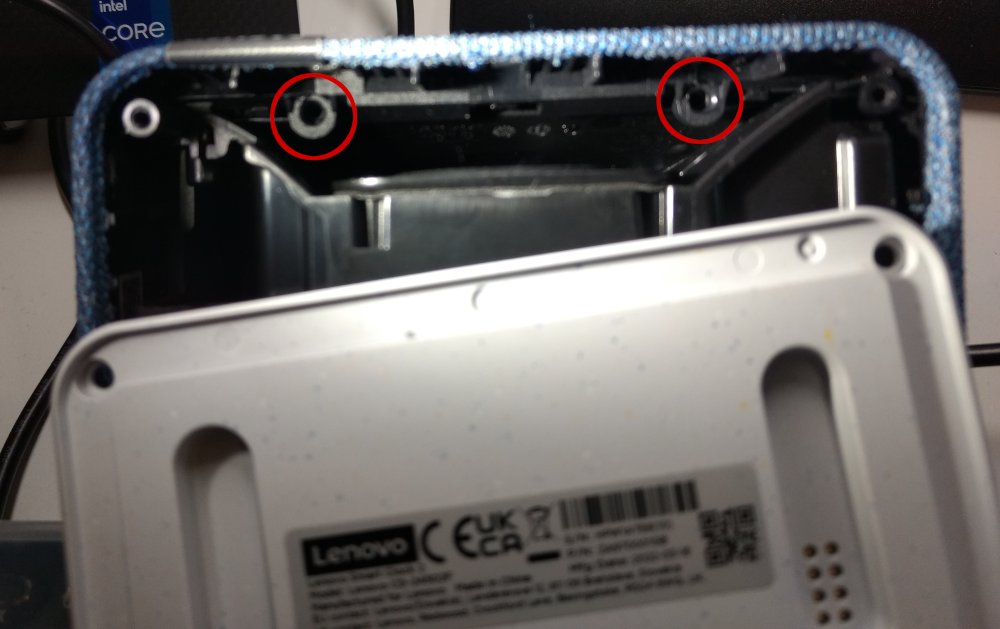
This then exposes a couple of additional screws which hold the screen in place, highlighted above. The screen can then be removed, exposing a circuit board containing the microphones and the ambient light sensor.
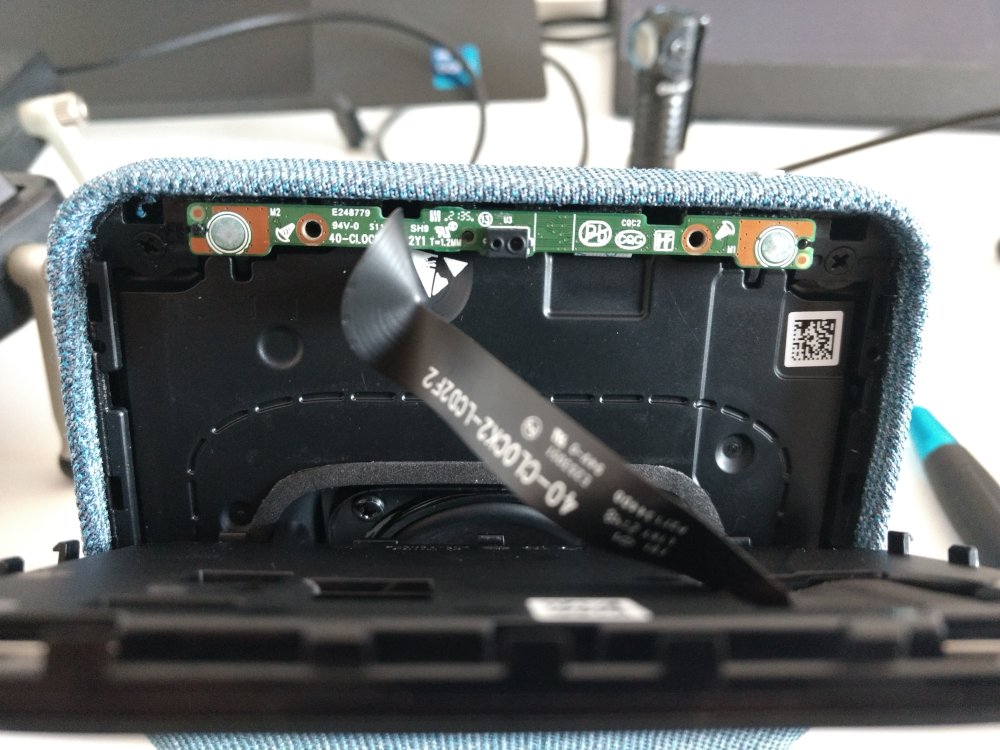
This can be removed. It is friction fit and there is another ribbon cable. Remove the ribbon cable and the microphones and sensor can be removed. Put everything back together and plug it in - there you go. You have a device that cannot listen to you.
This may be overkill, this device is going on a VLAN that doesn’t have internet access so there should be no way for it to talk back anyway. However, defence in depth is the best option in my opinion. If I connect it to the wrong network or misconfigure my firewall, I don’t want it sending any information back to anyone.
Home Assistant Setup
Next step, for me, was to set it up as a Home Assistant screen. I was able to install WallPanel which is a browser that can be controlled remotely via an HTTP API or MQTT. It is similar to the concept of FullyKioskBrowser. It is open source though and doesn’t lock features behind a paywall. I’ve used FullyKioskBrowser before, and it is a very competent piece of software, but I felt like trying something new.
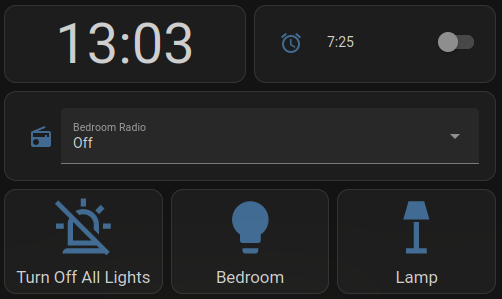
I created a simple dashboard in Home Assistant, and set the start URL for wallpanel to that dashboard. The screen is small, so you don’t really want lots of information on there. I have a clock, an alarm clock toggle, a radio station selection (more on that later) and a few buttons.
The next part of the setup was Browser Mod. This allows you to control a browser window through Home Assistant, adding the ability to use it as a media player or hide the navigation elements that are usually present. This allowed me to play (local) audio on the clock. It also allows me to remove the sidebar and top bar on the device to reclaim a little screen space.
Radio
One of the side effects of not allowing the clock to access the internet means it can’t play internet radio (hopefully that isn’t a surprise to anyone). However, I like to be woken up to the radio. It is probably possible to add some radio IP addresses to a whitelist. However, to make my life easier, I decided to proxy any radio stations through my home server, which does have internet access and the smart clock can communicate with.
For the most part this was pretty simple. I found stream URLs for a couple of radio stations. Here is the nginx configuration for Classic FM and Absolute Radio.
perl_set $unix_timestamp 'sub {
    time();
}';

server {
    listen       443 ssl;
    listen  [::]:443 ssl;

    ssl_certificate     /etc/nginx/certs/fullchain1.pem;
    ssl_certificate_key /etc/nginx/certs/privkey1.pem;

    server_name         radio.my.domain
    include /etc/nginx/conf.d/acl.inc;

    location /classicfm {
            proxy_pass http://icecast.thisisdax.com/ClassicFMMP3;
    }

    location /absolute {
            resolver 1.1.1.1;
            proxy_pass http://edge-bauerabsolute-05-gos2.sharp-stream.com/absoluteradiohigh.aac?aw_0_1st.skey=${unix_timestamp}&aw_0_1st.playerid=BMUK_RPi;
    }
}
I’m sure you can see how this can be extended for more stations. The only thing
that may not be obvious is the unix_timestamp variable in the absolute radio
url. I don’t know why it is necessary, but for some reason it is, so I define a
variable in the perl_set block at the top.
So, with this, I can run
mpv https://radio.my.domain/classicfm
And ClassicFM will play. With BrowserMod set up for the device, I can then run the service:
service: media_player.play_media
target:
  entity_id: media_player.alarm_clock
data:
  media_content_type: music
  media_content_id: "https://radio.my.domain/classicfm"
I would like to be able to add these URLs to the media library, however I haven’t yet found a way to do that. If anyone knows of a way, please let me know. However, for now I created a text helper with the following:
- Off
- Absolute Radio
- Classic FM
I then created an automation:
- alias: Clock Radio
  trigger:
  - platform: state
    entity_id:
    - input_select.bedroom_radio
  condition: []
  action:
  - if:
    - condition: state
      entity_id: input_select.radio
      state: Classic FM
    then:
    - service: media_player.play_media
      data:
        media_content_id: https://radio.hodgson.one/classicfm
        media_content_type: music
      target:
        entity_id: media_player.alarm_clock
  - if:
    - condition: state
      entity_id: input_select.radio
      state: Absolute Radio
    then:
    - service: media_player.play_media
      data:
        media_content_id: https://radio.hodgson.one/absolute
        media_content_type: music
      target:
        entity_id: media_player.alarm_clock
  - if:
    - condition: state
      entity_id: input_select.radio
      state: 'Off'
    then:
    - service: media_player.media_stop
      data: {}
      target:
        entity_id: media_player.alarm_clock
  mode: single
The last step is an automation for my alarm clock. It simply sets the input select we set up to ClassicFM. This then plays on the speaker.
The result is below: